Subscribe For Free Updates!

We'll not spam mate! We promise.

Monday, May 20, 2013

Make Your Own Antivirus


The main functioning of Antivirus is to detect and remove harmful or unwanted files which may slowdown your computer and windows. But if you don't have enough time to download any best antivirus. Then simply use this trick to make your own antivirus.This antivirus scan by using command prompt and delete unwanted files automatically.

  • Open your Notepad and paste this given code

@echo off
title Antivirus
echo Antivirus
echo created by your name
:start
IF EXIST virus.bat goto infected
IF NOT EXIST virus.bat goto clean
cd C:\Windows\system32
:infected
echo WARNING VIRUS DETECTED!
del virus.bat
pause
goto start
:clean
echo System secure!
pause
exit

  • Now save your file with SoftTechSpot.bat and select "All files"now run your saved files automatically scan will start.

Use A Flash Drive As RAM Memory


Do you have a slow or old Computer? Also, do you have a USB Flash Drive? Then now you are able to extend its memory by Increasing the RAM of your Computer using the memory available on the USB Flash Drive. This stuff is a trick that Windows provided as a solution to boost a little of your RAM memory and evade those little lags that Windows produces when it runs out of RAM resource. Increasing the PC's RAM using USB Flash Drive will help also enhance games performance and decrease the time of execution of some tasks made by software.
Follow me to Use a Flash Drive as RAM Memory:
Windows XP

  • Insert the Flash Drive then Right Click on My Computer > Properties
  • Navigate to Advanced tab then click Settings under Performance section.
  • Click Advanced tab again, and click Change under Virtual Memory section.
  • Select the USB Flash Drive letter from the list, click Custom Size .
  • Set the minimum and maximum size to use in the Flash Drive (better choose same size of flash drive)
  • Press OK and Apply all settings, Restart your Computer for changes to take effect.

Windows Vista / 7

  • Insert USB Flash Drive into your computer.
  • Right Click on the USB Flash Drive > Properties
  • Navigate to ReadyBoost tab.
  • Select Use this Device and allocate the amount of memory to use (better choose around 80% of USB Flash Drive's size)
  • Click OK to apply all settings, then Restart the computer for changes to take effect

4 Ways To Boost Your Booting Time


Slow booting is a major problem for majority of us.we have to wait for a long time to start our computer, but not worry friends because in this article i will provide you ways to boost you booting time. faster boot up seems to be an elusive goal for most of the people. we ourself can decrease the time it takes to start up our computer in windows with just few tweaks..lets see how it can be done.
Step 1: Hard Disk Check Up
Over time, your hard drives gets degraded both physically and digitally. It’s important to monitor your drives health. An error or damaged sector can throw software loading into an infinite loop causing long load times. To check your drive health:

  • Click Start
  • Choose Computer
  • Right Click your Hard Drive
  • Choose Properties
  • Click Check Drives Health. After, the check up gives you repair options or a clean bill of health.
  • Restart to get a faster boot up.

Step 2: Eliminate Startup Delay
To get faster boot up speeds, you can cut the boot delay to 0. The delay is in place to allow your startup processes some breathing room during loading. Your default delay is 30 seconds. So, you can eliminate it for faster boot up times.

  • Open your Start menu.
  • Click Run
  • In the command screen, type msconfig
  • In the system configuration utility, click either BOOT tab.
  • In the boot menu, change the default setting for the Time Out from 30 to 5 seconds.

Step 3: Organize your Hard Drive
If you are looking for something in a messy room, naturally, it’s going to take you longer to find something. This is a good metaphor for a hard drive. Over time, filing system gets disorganized. Periodically, you need to reorganize this filing system on your hard drive. Luckily, Windows has a good utility called Defrag that will put your system in order.

  • Open the Start Menu
  • Click on My Computer
  • Right Click your C: drive or your hard drive image.
  • Scroll down to the Click Properties
  • In the Properties Menus, Open the “Tools” menu.
  • Choose Defragment.
  • In the Disk Deframenter menu. Click on Defragment

Step 4: Remove Excess Startup Programs
Most programs you add to your computer will opt to load when you startup your computer. Eventually you will rack up a load of programs that kill faster boot times. You need to reduce the startup programs. You can easily disable unnecessary startup programs. Here is how:

  • Open your Start menu.
  • Click Run
  • Type msconfig, click Enter
  • In the system configuration utility,click either services or startup tab.
  • Uncheck all programs that your are no longer want to run in the background.
  • Click OK

How To Get Rid Computer Slowdowns And Hangs


There are many reasons for slowdowns and hangs of your computer. For this you have to try out several solutions and the actual cause to it. There are some basic steps that you should perform in case of slowdowns and hangs. Moreover you don't require any external software.
Follow me: 
Free up memory on your hard drive if your computer is performing slower than usual. A hard drive that is near capacity can cause the computer to significantly slow down. Delete any files you no longer use. You also can use the "Disk Cleanup" utility built into your computer. To launch this utility


  • Click  Start
  • All Programs
  • Accessories
  • System Tools
  • Disk Cleanup
  • A list of files is presented in a dialog box.
  • Click the check box next the files you want to delete and then click the "OK" button at the bottom of the dialog box to activate the utility.

Application Observe your computer and pinpoint a program or combination of programs that are running when it freezes. There might be a specific program responsible for freezing or crashing your computer. Try terminating that specific program and seeing if that fixes the problem. To terminate a program, press (CTRL+ALT+DEL) on your keyboard. This shortcut opens a window listing the currently running programs on your computer. Choose a program and click the "End Process" button to terminate the program.
Defragment your computer's files. Fragmented files occur when parts of a single file are stored in multiple places on the hard drive. This causes a computer to perform slowly because the computer must search in multiple places when accessing a fragmented file.

  • To defragment your computer click Start
  • All Programs
  • Accessories
  • System Tools
  • Disk Defragmenter.

Scan your computer for malicious files. Viruses or spyware often cause your computer to slow down or freeze. Use the virus scanner that is installed on your computer. If you don't have a virus scanner installed on your computer, there are online virus scanners available. After you have completed a virus scan, your results are displayed. The most desirable option is to delete any viruses or spyware that was found on your computer. Follow the virus scanner's prompts to delete the virus. However, not all viruses can simply be deleted. In this case, choose the "Quarantine" option in the virus scanner. This places the file in a separate folder or location on the drive where it can't affect other files
Repair any disk errors. Disk errors can cause your computer to slow down and freeze. You can use a utility on your computer to detect and fix disk errors. To do this, first open "My Computer." Right-click on the hard drive you want to repair and click "Properties." Click the "Tools" tab and then click the "Check Now" button. Select the check box next to "Scan for and attempt recovery of bad sectors." Then click the "Start" button and the utility detects and repairs bad sectors.
Reboot your computer if your computer freezes. Hold down the "Power" button on the computer for at least five seconds. Wait for the computer to shut down and restart the computer. This is usually a temporary fix, but will at least unfreeze your computer

Additional Precautions :
Back up the data on your computer if your computer is slow or freezing often. To back up data, plug in an external hard drive or insert a CD or DVD and copy important files onto the storage device. You can simply drag the files from your computer into the storage device's folder. You also can use the Windows backup and restore utility. Open the backup and restore utility in Windows from the "Control Panel" and follow the prompts to create an entire clone of your hard drive.
Try not to reboot your computer by holding down the "Power" button too often as this can destabilize the operating system

Bitdefender Antivirus 2012 Registered To 2045


Key Features: 

  • Defends against viruses and spyware
  • Halts ID theft attempts
  • Filters the links you receive from your Facebook and Twitter friends
  • Gives advance warning of risky websites

Features:

  • Unparalleled Security : Bitdefender capitalizes on live and virtualized behavior-based detection, in addition to cloud-based services, to stop emerging e-threats that other products miss.
  • Active Virus Control : Monitors processes’ behavior while they are running to detect new & unknown viruses
  • New! Rescue Mode : Reboots your computer in a trusted environment, which is used for cleanup and restoration
  • New! Virtualized Browser : Isolates the browser from the operating system in a Bitdefender-provided environment to block web-based threats.
  • Vulnerability Scanner : Checks for missing or outdated security software as well as potentially unsafe system settings.
  • Absolute Silence : Provides a hassle-free experience by making optimal security-related decisions without input from you.
  • New! Autopilot : Bitdefender's Autopilot makes all the security-related decisions for you!
  • Worry-free Socializing : Protect yourself, and your friends, from e-threats that attempt to exploit the trust you’ve built with them.
  • New! Social Network Protection : Filters the links you receive from your Facebook and Twitter friends and monitors your privacy settings.
  • Improved! Search Advisor : Gives advance warning of risky websites right in your Google and Bing search results.
  • Total Privacy : Bitdefender protects your privacy and personal data with a range of specialized modules and functions.
  • Personal Data Filter : Prevents critical data, such as your social security number, from ever leaving your computer.
  • Antiphising : Blocks websites supporting various scams or credit card phishing attempts.
  • Chat Encryption : Keeps your conversations private on Yahoo! and MSN Messenger.
  • Full Speed : Bitdefender 2012 takes “scheduled scanning” to a whole new level, as the scanning only takes place when your system is idle.
  • New! Scan Dispatcher : Triggers system scans when resource usage falls below a certain threshold to avoid any impact on your system’s performance.

Google AdSense 100% Approved Account

Friends, have u tried for adsense account ever and when tried but not approved and u become sad and hopeless, friends adsense is the dream of every person who interested in blogging. But due to adsense policies your didn't approve, it is a secret that robots are controlling all the adsense work there are not humans So we can cheat them by the trick. So friends don't become hopeless, i will approve your adsense account 100% (genuine account) for only 7$. So friends contact me on Facebook...
Mobile no. +923344831464
+923046624459
Facebook https://www.facebook.com/aliinineash
https://www.facebook.com/khawaja.ali.6624459

Learn Arbic With Urdu Words


Saturday, May 18, 2013

How to Change Background Image for Facebook Login Page In Chrome

Facebook is currently the biggest online ada where people join and translate each others thoughts and communicate in many different ways by chatting, sending emoticons and sharing images, well now to make some more adjustments we have found an interesting and easy way for changing your Facebook’s login page background image. We tried to do it and applied interesting abstract flower image which you can check below.Facebook is currently the biggest online ada where people join and translate each others thoughts and communicate in many different ways by chatting, sending emoticons and sharing images, well now to make some more adjustments we have found an interesting and easy way for changing your Facebook’s login page background image. We tried to do it and applied interesting abstract flower image which you can check below.Now as you can see in the above image we have changed the background image and style of Facebook Login Page, well now I just applied some random abstract image, you can go with any one applying your personal or with friends image on the background. So now when ever any one opens Facebook.com on your PC if will be greeted by that image with options to Log-In on Facebook.


Steps to Change FB Background Image:

  • Make sure chrome is installed now install the FB Refresh Extension.
  • After you have installed the extension now just head over to Facebook.com and you will see that page in a new way something like above but obviously not that image, so now you have to click on the small gear icon above the Log In button.


  • Now after you click on the small Gear Icon you will see window like above asking you to insert the image URL for the image you wanna use for the background (If you wanted to use the same image we have used in the above demo image than you can grab the link here)
  • Now you can choose if you wanna repeat the image and in which direction X for Horizontal and Y for Vertical and than just click on Save Boom, now just navigate to Facebook.com and enjoy the new fresh background.


How to Post Animated GIF Images on your Facebook Wall

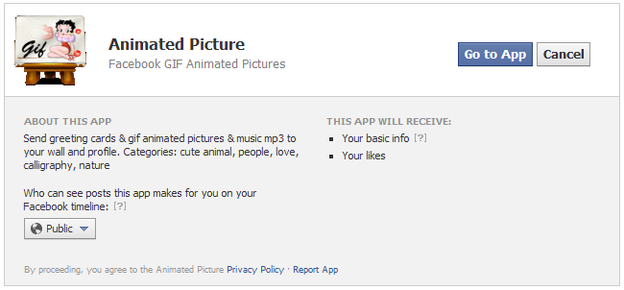
Facebook still does not allow you to upload your GIF Images directly using the photo uploading option they normally provide, but well there are some application on Facebook that enable you too post these kinds of images on your or your friends wall.With Animated-Picture for Facebook you can post animated GIF Images either using images in their own database or uploading and using your personal images through the URL option they provide. So now just check out the steps below on how you can also enjoy this awesome GIF images posting on Facebook.


Steps:

  • Make sure you are signed in on Facebook and than visit the Animated-Picture Facebook Application page.


  • Now just click on the Go to App button and you will be in their interface, now you can either select images from their own database or you can put the URL of the animated GIF Image hosted somewhere else.


  • So now if you do not have any image hosted outside you can go for their images in their database divided into different categories, so you can check out images from cute animals, if you are romantic you can go for the Love and so on.
  • So now when you are done choosing your image which you are gonna share just click on it and you will a popup like above asking you too enter the title you wanna display as your status while the image animated below.
  • Now just click on share and that’s it your animated image is now live right on your wall. Well there are some images which might not work, or your friends have to click on them for the redirection well I am still finding any other good app which works more perfectly till than have fun...

Create your own Images as Emoticons for Facebook Chat

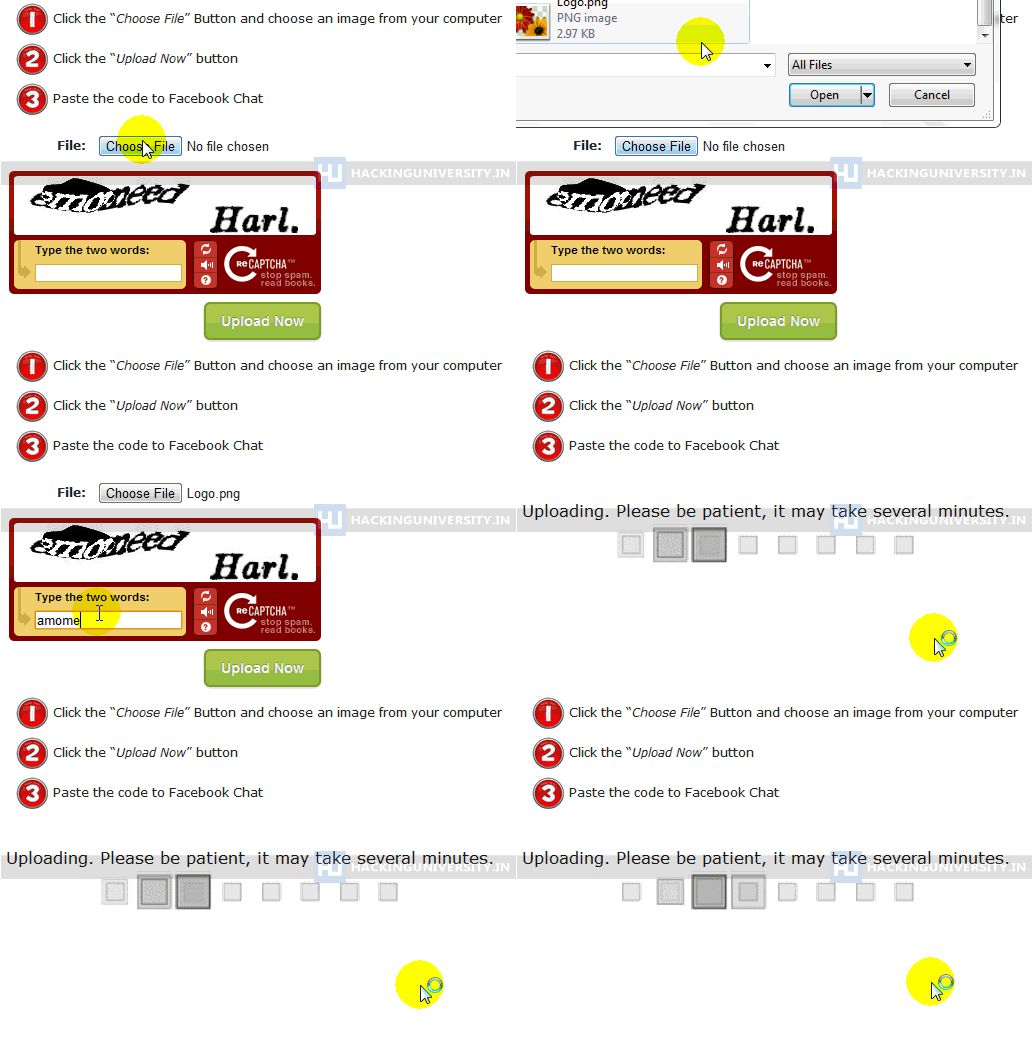
Today I told you how you can send your image in Facebook chat the images can be created using a simple online website called “Smileyti.me”. Now it’s a simple image uploading and emoticon conversion website which will simply create some different codes for your images when they are complied together you get your image drawn right in front of your eyes.So now I have a created a Gif image for helping you out in uploading your image and using that website below so now just follow below steps and have fun creating your own funny images.

Steps:

  1. Just visit there website http://smileyti.me/
  2. Now you will see page asking you to choose your image and than entering that irritating captcha you can follow below .gif image we created uploading our default website logo.
3. Now after you upload your image you will get your code like below.
4. Now that’s your final code, just copy this code and paste it in your Facebook chat and you will see your image rendering simply perfect.

How To Know Who Unfriend You On Facebook


Today Facebook is the largest social networking site. Almost everyone who uses Internet are having Facebook account.Facebook so that your social networking skills could develop and you will have good online Friends.Guys remember one thing don't accept a friend request from an unknown people on Facebook cause they can be  psychic who will post abusive things on your wall or may be an hacker who will take your personal information for any destructive purpose.
How to Know Who Unfriend Us ???
So friends as we all know that Facebook does not provide information about who unfriend us and who have visited our profile ? and we all are curious to know these things because it seems to be quite annoying that someone has unfriend us so i am going to tell you the way to recognize who have unfriend / blocked us.

Follow my instructions:


  • 1st of all visit this site.
  • Now you are in the site.
  • Tick Here To use this servise you have to accept the Terms of Use 
  • Now it will access your facebook account.
  • Log in to u your account & press allow.
  • Now the site will show ur friendz and peoples who unfriends u

Send Colourfull alphabets in Facebook Chat

'll tell u how to post colourful alphabets in Facebook chat Now Guys you can also write message to your friend in this type of Style....COLOUR FULL letter.. Here Is the Tricks.. Copy the below code related to alphabet and paste it where u wana send......!!


[[244961858909298]] = A

[[344113652270150]] = B

[[344991278847613]] = C

[[164461493653696]] = D

[[196752423751220]] = E

[[301630573215430]] = F

[[251496118250464]] = G

[[266394220086654]] = H

[[164866556948132]] = I

[[180599335371968]] = J

[[209067005843651]] = K

[[238594039545396]] = L

[[147702285338528]] = M

[[309221402452022]] = N

[[180901405340714]] = O

[[246506925416551]] = P

[[333343613344059]] = Q

[[123128367803569]] = R

[[316143388416019]] = S

[[334073456605673]] = T

[[199626093460643]] = U

[[224202614323263]] = V

[[336032459740792]] = W

[[205228226232732]] = X

[[142420399202282]] = Y

[[157919817645224]] = Z

How To Post A Blank Post In Facebook ?


How To Post A Blank Post In
Facebook …. .
So Just Follow Belowed Simple
Steps…

  1. Go To Facebook Wall Post …
  2. In Post Status Write The

Code Given Below…

@[0 : 0: ]
Now Post Status …

20 Awesome List of Google Tricks


As Google is the best search engine its also one of the most hotspot for occasional tricks and tweaks which we are going to discuss right below. So these list of Google tricks will attract your attention and entertain you and your friends. You must check all tricks listed below maybe you know many of them as we have posted some in our earlier posts but some are totally new to us.

20 Awesome Google Tricks :

  1. Type “let it snow” and click on I’m Feeling Lucky. (awesome snow effect)
  2. Type “google gravity” and click on I’m Feeling Lucky. (things start falling down)
  3. Type “elggog” and click on I’m Feeling Lucky. (amazing mirror effect)
  4. Type “do a barrel roll” and click on I’m Feeling Lucky. (a nice barrel roll attempted)
  5. Type “who’s awesome” and click on I’m Feeling Lucky. (check it out yourself)
  6. Type “tilt” and click on I’m Feeling Lucky. (webpage in 3D)
  7. Type “who is the cutest” and click on I’m Feeling Lucky. (cute reviewed)
  8. Type “google loco” and click on I’m Feeling Lucky. (someone starts moving)
  9. Type “lol limewire” and click on I’m Feeling Lucky. (awesome picture)
  10. Type “epic google” and click on I’m Feeling Lucky. (check it out yourself)
  11. Type “rainbow google” and click on I’m Feeling Lucky. (check it out yourself)
  12. Type “annoying google” and click on I’m Feeling Lucky. (check it out yourself)
  13. Type “google pacman” and click on I’m Feeling Lucky. (check it out yourself)
  14. Type “google heart page” and click on I’m Feeling Lucky. (check it out yourself)
  15. Type “google magic” and click on I’m Feeling Lucky. (check it out yourself)
  16. Type “google (color name)” and click on I’m Feeling Lucky. (check it out yourself)
  17. Type “epic box” and click on I’m Feeling Lucky. (check it out yourself)
  18. Type “sexy snape” and click on I’m Feeling Lucky. (check it out yourself)
  19. Type “google sphere” and click on I’m Feeling Lucky. (check it out yourself)
  20. Type “weenie google” and click on I’m Feeling Lucky. (check it out yourself)

So now pump these words into Google search and than click on I’m Feeling Lucky button and get amazed with awesome Google Tricks. Now you might get some problems as Google has updated their search page and now Instant search is on so make sure you turn that off by going to the Settings Gear icon and choosing Instant search off.

Sunday, May 5, 2013

How To Fix Error Reporting In Windows XP

Friends, sometimes when u open ur browser or any thing in ur PC and it give a error like the following image, so u want to remove it, so here is a solution....

Steps:
  1. Right-click My Computer and choose Properties.
  2. Click the Advanced tab on your System Properties dialog box.
  3. Click the Error Reporting button on the Advanced tab.
  4. Leave the other radio button unchecked next to the text labeled, "But notify me when critical errors occur."
  5. Click OK.


Make The Folder Invisible Without Hiding


Friends, now u can make ur folder indivisible by this trick without hiding, or ithout using the Folder lock

Steps:
  • Right Click on the desktop.Make a new folder

  • Now rename the folder with a space (U have to hold ALT key and type 0160) OR By Holding Alt Key and type 255
  • Now u have a folder with out a name.
  • Right click on the folder>properties>customize. Click on change icon.


Don't Forgot To Clicks On My Ads:P

Friday, May 3, 2013

How To Install Windows 8 Step By Step With Screenshots


In this guide I will cover the installation of Microsoft Windows 8 Release Preview 64-bit from a installation image. The installation of 32-bit and 64-bit are the same as this guide. I will try to explain certain options and provide helpful hints along the way, so rather than just following the guide, you can understand the reasoning behind the decisions.
If there are any mistakes please draw my attention to them and I will correct as needed. I have tried to make this as simple as possible, whilst covering the vast majority of scenarios users will come across whilst installing this operating system.


Step 1:


The first thing you should do is head to Download the installation image.

Step 2:
Using your disc burning software, burn the .iso you downloaded to a DVD.
Step 3:


Before you go any further, ensure all important data is backed up in case of data loss on your drives. This guide assumes you have media backups of your hard drives and you are safe to proceed.
Warning: Installing another operating system without first ensuring you have backups of your current files and operating system is a big risk. If you have no data to lose or you’ve backed up important data, you’re ready to proceed. YOU are responsible if you lose data.
Disclaimer: It goes without saying, that neither me or TechSpot accept any liability or responsibility for any errors or damages made to your computer during, or after installing this operating system. It is up to the user to ensure proper backups are made of important documents and files.

Step 4:
Ensure you have a network cable connected, restart your computer, and boot from the DVD drive.
Step 5:
The DVD will begin to load up, and you'll be presented by the following screen as the installer starts.


Step 6:
Once loaded you will see the following screen.
Select your location, keyboard and regional language settings as required and click "next" to continue and you'll see the following box:
Click "Install now" to continue with the installation.

Step 7:
You'll then be asked to provide the product key to activate Windows.
Enter the product key as written in the screenshot above. For the sake of clarity, the product key is TK8TP-9JN6P-7X7WW-RFFTV-B7QPF for both the 32-bit and 64-bit versions.

Once you have entered the product key, click "next" to continue to the next step.

Step 8:
Before you can proceed with the setup any further you're required to accept Microsoft's license terms, as below.
Read the terms, and once you're happy, tick the "I accept the license terms" box, and click "next" to continue to the next step.

Step 9:
You will be greeted with the following screen.
For the purposes of this guide, we'll assume you are performing a fresh installation of Windows 8 Release Preview. Therefore, this tutorial covers the "Custom" option which will install a fresh copy of Windows 8 Release Preview onto a clean hard drive, without backing up and restoring any existing files or settings.

The first option, "upgrade" will allow those running previous versions of Windows to upgrade to Windows 8 whilst keeping all files, settings and applications during the setup of the new operating system.

Step 10:
The setup will then continue and start the disk manager as below.

Select the correct drive to use for the installation of Windows 8 Release Preview, and click "next" to continue. For those trying this in a Virtual Machine, 20-25GB of hard drive space is more than adequate.

Note: This step is the last point in which you can abort the installation without permanent data loss to drives. Please ensure you have working backups before proceeding further.

Step 11:
Windows setup will then begin to install Windows 8 Release Preview to the hard drive, and will work through several stages as detailed below.
The installer may restart during the installation stage as it configures the computer to run the new operating system.

Step 12:
Once complete, it will reboot again and setup the computers devices and finalize the installation, as below.

Once this stage has finished, you will be greeted with the following screen.
Select your preferred colour scheme for Metro, and then name your computer. The PC name is used to identify the computer on local networks and ideally should be named so that other users your network can identify who the computer belongs to. Then click "next" to proceed.

Step 13:
You will then be greeted with the following window.

At this point you can specify the final settings required in the configuration of your new Windows installation. You can either choose "use express settings" or click "customize" to change the express settings.

If you are unsure, it is best to choose the first option. The installer will then configure the final settings and move onto the next step.

Step 14:
The next step asks you if you wish to sign into your PC using a Windows Live account.
Unlike previous versions of Windows, Microsoft's new operating system heavily integrates the Redmond-based firms Windows Live features, including messenger, contacts, calendar and mail.

Signing in using your Windows Live account also offers Windows 8 users additional benefits like the ability to download additional apps from the Windows Store and automatic synchronization of all your Windows 8 computers so they look and feel the same regardless of which one you're using.

Note: Your Windows Live ID also becomes your username for Windows 8 Release Preview, and uses your Windows Live ID password to log in.

Enter your Windows Live ID, and click "next" to continue.


You will then be asked for your password for your Windows Live account. Click "next" to continue.


The final step of integrating your Windows Live account with your new installation of Windows 8 Release Preview requires you to provide additional verification information. For those that have previously set this up, the fields will be completed already. Verify they are correct, or add the required information and click "next" to continue.

Step 15:
Windows 8 Release Preview will then complete its final configuration.


Once complete, it will then boot into Windows for the first time, as below.


Installation is now complete, and you can enjoy your new OS and begin exploring its features.

Don't Forgot To Clicks On My Ads:P