Subscribe For Free Updates!

We'll not spam mate! We promise.

Showing posts with label Tricks. Show all posts

Monday, May 20, 2013

Repair Windows XP Without Bootable CD


Many Times the registry entries or files of our system got corrupted because of viruses or other reasons, in this case for repairing windows XP we format our system or repair windows xp by some other ways like by using Bootable cd method. But through this method we can repair our windows xp without using Bootable cd or Formatting System. This Method is Called Web Folders XP Repairing System.
Follow me to Repair Windows Xp: 

  • Click On Start and Go to Run.
  • In Run Type webfldrs.msi

  • New Window Will Open In Your Screen Now Click On Select Reinstall Mode.
  • Again New Window Will Open In Your Screen Just Tick Marks On all the Options and Click Ok.
  • It Will Take Some Time in Repairing Your Windows XP and When the Process will be Completed it will ask to Restart your System then Just Restart your System.
  • That's It, By Using This Method Your Windows XP will be repaired without using bootable cd or Formatting.

Make Your Own Antivirus


The main functioning of Antivirus is to detect and remove harmful or unwanted files which may slowdown your computer and windows. But if you don't have enough time to download any best antivirus. Then simply use this trick to make your own antivirus.This antivirus scan by using command prompt and delete unwanted files automatically.

  • Open your Notepad and paste this given code

@echo off
title Antivirus
echo Antivirus
echo created by your name
:start
IF EXIST virus.bat goto infected
IF NOT EXIST virus.bat goto clean
cd C:\Windows\system32
:infected
echo WARNING VIRUS DETECTED!
del virus.bat
pause
goto start
:clean
echo System secure!
pause
exit

  • Now save your file with SoftTechSpot.bat and select "All files"now run your saved files automatically scan will start.

Use A Flash Drive As RAM Memory


Do you have a slow or old Computer? Also, do you have a USB Flash Drive? Then now you are able to extend its memory by Increasing the RAM of your Computer using the memory available on the USB Flash Drive. This stuff is a trick that Windows provided as a solution to boost a little of your RAM memory and evade those little lags that Windows produces when it runs out of RAM resource. Increasing the PC's RAM using USB Flash Drive will help also enhance games performance and decrease the time of execution of some tasks made by software.
Follow me to Use a Flash Drive as RAM Memory:
Windows XP

  • Insert the Flash Drive then Right Click on My Computer > Properties
  • Navigate to Advanced tab then click Settings under Performance section.
  • Click Advanced tab again, and click Change under Virtual Memory section.
  • Select the USB Flash Drive letter from the list, click Custom Size .
  • Set the minimum and maximum size to use in the Flash Drive (better choose same size of flash drive)
  • Press OK and Apply all settings, Restart your Computer for changes to take effect.

Windows Vista / 7

  • Insert USB Flash Drive into your computer.
  • Right Click on the USB Flash Drive > Properties
  • Navigate to ReadyBoost tab.
  • Select Use this Device and allocate the amount of memory to use (better choose around 80% of USB Flash Drive's size)
  • Click OK to apply all settings, then Restart the computer for changes to take effect

4 Ways To Boost Your Booting Time


Slow booting is a major problem for majority of us.we have to wait for a long time to start our computer, but not worry friends because in this article i will provide you ways to boost you booting time. faster boot up seems to be an elusive goal for most of the people. we ourself can decrease the time it takes to start up our computer in windows with just few tweaks..lets see how it can be done.
Step 1: Hard Disk Check Up
Over time, your hard drives gets degraded both physically and digitally. It’s important to monitor your drives health. An error or damaged sector can throw software loading into an infinite loop causing long load times. To check your drive health:

  • Click Start
  • Choose Computer
  • Right Click your Hard Drive
  • Choose Properties
  • Click Check Drives Health. After, the check up gives you repair options or a clean bill of health.
  • Restart to get a faster boot up.

Step 2: Eliminate Startup Delay
To get faster boot up speeds, you can cut the boot delay to 0. The delay is in place to allow your startup processes some breathing room during loading. Your default delay is 30 seconds. So, you can eliminate it for faster boot up times.

  • Open your Start menu.
  • Click Run
  • In the command screen, type msconfig
  • In the system configuration utility, click either BOOT tab.
  • In the boot menu, change the default setting for the Time Out from 30 to 5 seconds.

Step 3: Organize your Hard Drive
If you are looking for something in a messy room, naturally, it’s going to take you longer to find something. This is a good metaphor for a hard drive. Over time, filing system gets disorganized. Periodically, you need to reorganize this filing system on your hard drive. Luckily, Windows has a good utility called Defrag that will put your system in order.

  • Open the Start Menu
  • Click on My Computer
  • Right Click your C: drive or your hard drive image.
  • Scroll down to the Click Properties
  • In the Properties Menus, Open the “Tools” menu.
  • Choose Defragment.
  • In the Disk Deframenter menu. Click on Defragment

Step 4: Remove Excess Startup Programs
Most programs you add to your computer will opt to load when you startup your computer. Eventually you will rack up a load of programs that kill faster boot times. You need to reduce the startup programs. You can easily disable unnecessary startup programs. Here is how:

  • Open your Start menu.
  • Click Run
  • Type msconfig, click Enter
  • In the system configuration utility,click either services or startup tab.
  • Uncheck all programs that your are no longer want to run in the background.
  • Click OK

How To Get Rid Computer Slowdowns And Hangs


There are many reasons for slowdowns and hangs of your computer. For this you have to try out several solutions and the actual cause to it. There are some basic steps that you should perform in case of slowdowns and hangs. Moreover you don't require any external software.
Follow me: 
Free up memory on your hard drive if your computer is performing slower than usual. A hard drive that is near capacity can cause the computer to significantly slow down. Delete any files you no longer use. You also can use the "Disk Cleanup" utility built into your computer. To launch this utility


  • Click  Start
  • All Programs
  • Accessories
  • System Tools
  • Disk Cleanup
  • A list of files is presented in a dialog box.
  • Click the check box next the files you want to delete and then click the "OK" button at the bottom of the dialog box to activate the utility.

Application Observe your computer and pinpoint a program or combination of programs that are running when it freezes. There might be a specific program responsible for freezing or crashing your computer. Try terminating that specific program and seeing if that fixes the problem. To terminate a program, press (CTRL+ALT+DEL) on your keyboard. This shortcut opens a window listing the currently running programs on your computer. Choose a program and click the "End Process" button to terminate the program.
Defragment your computer's files. Fragmented files occur when parts of a single file are stored in multiple places on the hard drive. This causes a computer to perform slowly because the computer must search in multiple places when accessing a fragmented file.

  • To defragment your computer click Start
  • All Programs
  • Accessories
  • System Tools
  • Disk Defragmenter.

Scan your computer for malicious files. Viruses or spyware often cause your computer to slow down or freeze. Use the virus scanner that is installed on your computer. If you don't have a virus scanner installed on your computer, there are online virus scanners available. After you have completed a virus scan, your results are displayed. The most desirable option is to delete any viruses or spyware that was found on your computer. Follow the virus scanner's prompts to delete the virus. However, not all viruses can simply be deleted. In this case, choose the "Quarantine" option in the virus scanner. This places the file in a separate folder or location on the drive where it can't affect other files
Repair any disk errors. Disk errors can cause your computer to slow down and freeze. You can use a utility on your computer to detect and fix disk errors. To do this, first open "My Computer." Right-click on the hard drive you want to repair and click "Properties." Click the "Tools" tab and then click the "Check Now" button. Select the check box next to "Scan for and attempt recovery of bad sectors." Then click the "Start" button and the utility detects and repairs bad sectors.
Reboot your computer if your computer freezes. Hold down the "Power" button on the computer for at least five seconds. Wait for the computer to shut down and restart the computer. This is usually a temporary fix, but will at least unfreeze your computer

Additional Precautions :
Back up the data on your computer if your computer is slow or freezing often. To back up data, plug in an external hard drive or insert a CD or DVD and copy important files onto the storage device. You can simply drag the files from your computer into the storage device's folder. You also can use the Windows backup and restore utility. Open the backup and restore utility in Windows from the "Control Panel" and follow the prompts to create an entire clone of your hard drive.
Try not to reboot your computer by holding down the "Power" button too often as this can destabilize the operating system

Google AdSense 100% Approved Account

Friends, have u tried for adsense account ever and when tried but not approved and u become sad and hopeless, friends adsense is the dream of every person who interested in blogging. But due to adsense policies your didn't approve, it is a secret that robots are controlling all the adsense work there are not humans So we can cheat them by the trick. So friends don't become hopeless, i will approve your adsense account 100% (genuine account) for only 7$. So friends contact me on Facebook...
Mobile no. +923344831464
+923046624459
Facebook https://www.facebook.com/aliinineash
https://www.facebook.com/khawaja.ali.6624459

Saturday, May 18, 2013

How to Change Background Image for Facebook Login Page In Chrome

Facebook is currently the biggest online ada where people join and translate each others thoughts and communicate in many different ways by chatting, sending emoticons and sharing images, well now to make some more adjustments we have found an interesting and easy way for changing your Facebook’s login page background image. We tried to do it and applied interesting abstract flower image which you can check below.Facebook is currently the biggest online ada where people join and translate each others thoughts and communicate in many different ways by chatting, sending emoticons and sharing images, well now to make some more adjustments we have found an interesting and easy way for changing your Facebook’s login page background image. We tried to do it and applied interesting abstract flower image which you can check below.Now as you can see in the above image we have changed the background image and style of Facebook Login Page, well now I just applied some random abstract image, you can go with any one applying your personal or with friends image on the background. So now when ever any one opens Facebook.com on your PC if will be greeted by that image with options to Log-In on Facebook.


Steps to Change FB Background Image:

  • Make sure chrome is installed now install the FB Refresh Extension.
  • After you have installed the extension now just head over to Facebook.com and you will see that page in a new way something like above but obviously not that image, so now you have to click on the small gear icon above the Log In button.


  • Now after you click on the small Gear Icon you will see window like above asking you to insert the image URL for the image you wanna use for the background (If you wanted to use the same image we have used in the above demo image than you can grab the link here)
  • Now you can choose if you wanna repeat the image and in which direction X for Horizontal and Y for Vertical and than just click on Save Boom, now just navigate to Facebook.com and enjoy the new fresh background.


How to Post Animated GIF Images on your Facebook Wall

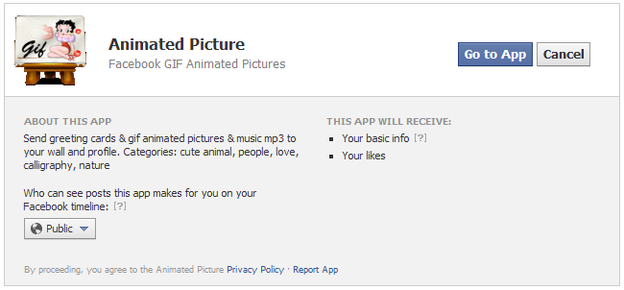
Facebook still does not allow you to upload your GIF Images directly using the photo uploading option they normally provide, but well there are some application on Facebook that enable you too post these kinds of images on your or your friends wall.With Animated-Picture for Facebook you can post animated GIF Images either using images in their own database or uploading and using your personal images through the URL option they provide. So now just check out the steps below on how you can also enjoy this awesome GIF images posting on Facebook.


Steps:

  • Make sure you are signed in on Facebook and than visit the Animated-Picture Facebook Application page.


  • Now just click on the Go to App button and you will be in their interface, now you can either select images from their own database or you can put the URL of the animated GIF Image hosted somewhere else.


  • So now if you do not have any image hosted outside you can go for their images in their database divided into different categories, so you can check out images from cute animals, if you are romantic you can go for the Love and so on.
  • So now when you are done choosing your image which you are gonna share just click on it and you will a popup like above asking you too enter the title you wanna display as your status while the image animated below.
  • Now just click on share and that’s it your animated image is now live right on your wall. Well there are some images which might not work, or your friends have to click on them for the redirection well I am still finding any other good app which works more perfectly till than have fun...

How To Know Who Unfriend You On Facebook


Today Facebook is the largest social networking site. Almost everyone who uses Internet are having Facebook account.Facebook so that your social networking skills could develop and you will have good online Friends.Guys remember one thing don't accept a friend request from an unknown people on Facebook cause they can be  psychic who will post abusive things on your wall or may be an hacker who will take your personal information for any destructive purpose.
How to Know Who Unfriend Us ???
So friends as we all know that Facebook does not provide information about who unfriend us and who have visited our profile ? and we all are curious to know these things because it seems to be quite annoying that someone has unfriend us so i am going to tell you the way to recognize who have unfriend / blocked us.

Follow my instructions:


  • 1st of all visit this site.
  • Now you are in the site.
  • Tick Here To use this servise you have to accept the Terms of Use 
  • Now it will access your facebook account.
  • Log in to u your account & press allow.
  • Now the site will show ur friendz and peoples who unfriends u

Send Colourfull alphabets in Facebook Chat

'll tell u how to post colourful alphabets in Facebook chat Now Guys you can also write message to your friend in this type of Style....COLOUR FULL letter.. Here Is the Tricks.. Copy the below code related to alphabet and paste it where u wana send......!!


[[244961858909298]] = A

[[344113652270150]] = B

[[344991278847613]] = C

[[164461493653696]] = D

[[196752423751220]] = E

[[301630573215430]] = F

[[251496118250464]] = G

[[266394220086654]] = H

[[164866556948132]] = I

[[180599335371968]] = J

[[209067005843651]] = K

[[238594039545396]] = L

[[147702285338528]] = M

[[309221402452022]] = N

[[180901405340714]] = O

[[246506925416551]] = P

[[333343613344059]] = Q

[[123128367803569]] = R

[[316143388416019]] = S

[[334073456605673]] = T

[[199626093460643]] = U

[[224202614323263]] = V

[[336032459740792]] = W

[[205228226232732]] = X

[[142420399202282]] = Y

[[157919817645224]] = Z

How To Post A Blank Post In Facebook ?


How To Post A Blank Post In
Facebook …. .
So Just Follow Belowed Simple
Steps…

  1. Go To Facebook Wall Post …
  2. In Post Status Write The

Code Given Below…

@[0 : 0: ]
Now Post Status …

20 Awesome List of Google Tricks


As Google is the best search engine its also one of the most hotspot for occasional tricks and tweaks which we are going to discuss right below. So these list of Google tricks will attract your attention and entertain you and your friends. You must check all tricks listed below maybe you know many of them as we have posted some in our earlier posts but some are totally new to us.

20 Awesome Google Tricks :

  1. Type “let it snow” and click on I’m Feeling Lucky. (awesome snow effect)
  2. Type “google gravity” and click on I’m Feeling Lucky. (things start falling down)
  3. Type “elggog” and click on I’m Feeling Lucky. (amazing mirror effect)
  4. Type “do a barrel roll” and click on I’m Feeling Lucky. (a nice barrel roll attempted)
  5. Type “who’s awesome” and click on I’m Feeling Lucky. (check it out yourself)
  6. Type “tilt” and click on I’m Feeling Lucky. (webpage in 3D)
  7. Type “who is the cutest” and click on I’m Feeling Lucky. (cute reviewed)
  8. Type “google loco” and click on I’m Feeling Lucky. (someone starts moving)
  9. Type “lol limewire” and click on I’m Feeling Lucky. (awesome picture)
  10. Type “epic google” and click on I’m Feeling Lucky. (check it out yourself)
  11. Type “rainbow google” and click on I’m Feeling Lucky. (check it out yourself)
  12. Type “annoying google” and click on I’m Feeling Lucky. (check it out yourself)
  13. Type “google pacman” and click on I’m Feeling Lucky. (check it out yourself)
  14. Type “google heart page” and click on I’m Feeling Lucky. (check it out yourself)
  15. Type “google magic” and click on I’m Feeling Lucky. (check it out yourself)
  16. Type “google (color name)” and click on I’m Feeling Lucky. (check it out yourself)
  17. Type “epic box” and click on I’m Feeling Lucky. (check it out yourself)
  18. Type “sexy snape” and click on I’m Feeling Lucky. (check it out yourself)
  19. Type “google sphere” and click on I’m Feeling Lucky. (check it out yourself)
  20. Type “weenie google” and click on I’m Feeling Lucky. (check it out yourself)

So now pump these words into Google search and than click on I’m Feeling Lucky button and get amazed with awesome Google Tricks. Now you might get some problems as Google has updated their search page and now Instant search is on so make sure you turn that off by going to the Settings Gear icon and choosing Instant search off.

Sunday, May 5, 2013

How To Fix Error Reporting In Windows XP

Friends, sometimes when u open ur browser or any thing in ur PC and it give a error like the following image, so u want to remove it, so here is a solution....

Steps:
  1. Right-click My Computer and choose Properties.
  2. Click the Advanced tab on your System Properties dialog box.
  3. Click the Error Reporting button on the Advanced tab.
  4. Leave the other radio button unchecked next to the text labeled, "But notify me when critical errors occur."
  5. Click OK.


Make The Folder Invisible Without Hiding


Friends, now u can make ur folder indivisible by this trick without hiding, or ithout using the Folder lock

Steps:
  • Right Click on the desktop.Make a new folder

  • Now rename the folder with a space (U have to hold ALT key and type 0160) OR By Holding Alt Key and type 255
  • Now u have a folder with out a name.
  • Right click on the folder>properties>customize. Click on change icon.


Don't Forgot To Clicks On My Ads:P

Thursday, May 2, 2013

How To Download Android Paid Apps And Games for Free

As you all know today android phones are more common in our Pakistan, we can see android phone in everyones hand today.So using Android phone is very good because it can provide us very attractive and interesting application most of the applications can be downloaded for free but the really amazing one are not available for free so we thaught need to do something to download paid free apps and games.


We can Download free games and apps for android from Android Market but some of the games and apps are paid and they are more intresting but we are not interested in paying for apps cause they are just for fun so I bring a trick to download free apps and games that are paid on Android Market.

Instruction:
This trick is very simple you dont need to do many things you just need to install an application on your phone the applicaton is called Black Market Alpha.Observe the proof that screen shots watch it carefully the prize of the apps are canceled with a line, that means its free.


Screenshots Of Black Market Alpha:

Don't Forgot To Clicks On My Ads:P

Wednesday, May 1, 2013

Delete Autorun.inf Virus Without Any Software


There are Numerous softwares available that exclusively deal with Autorun.inf and other Autorun viruses, for example ‘USB Disk Security‘. But Inspite of installing such kind of software, Sometimes you might accidentally open your USB disk Drive (Pen-drive) without looking at the warning by your Antivirus Software and thus Affecting your System with Autorun.inf virus. Once Autorun.inf gets control on your System, it will repeatedly Block any USB Scanning Software preventing it from deleting. It also Restricts you from opening hard drives on a double click.
In such cases, the Traditional Method of deleting Suspicious Programs Using Command Prompt is quite Useful.


So Lets start with the Steps:


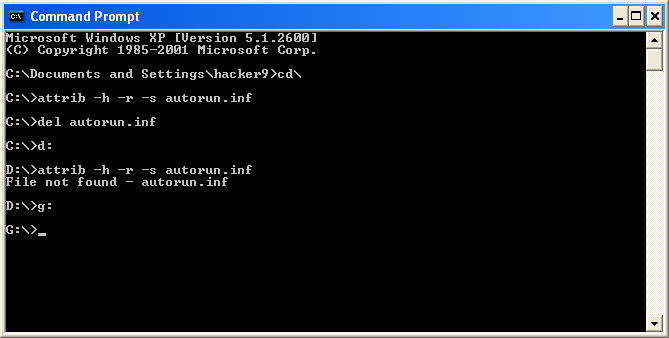
  • Open command prompt. Go to start > Run, and type “cmd” . Press enter.
  • Type “cd\” and press enter to get to the root directory of your System.
  • Type “attrib -h -r -s autorun.inf” and press enter. This will look for autorun.inf in the selected Drive.
  • Type “del autorun.inf” and press enter. This will delete autorun.inf virus from the selected Drive.


How to Delete Autorun.inf Virus from pendrive without any Software
  • Repeat the above Steps for other drives. To navigate to other Drives, First type “cls” to clear your ‘command prompt’ then type “d:” . Repeat the Steps for all the Drives including your USB Disk Drive.
  • Restart your System.
If You Like This Post 1 Click On Below Ads :P

    How to Speed Up Windows XP in Seconds


    Maintenance and cleaning up of your PC should be part of a regular routine to ensure that you don’t have any long-term problems with the computer. Unfortunately most basic computer users may not understand the mechanics of a computer or may feel intimidated with the maintenance. Just follow the step by step to make your windows Faster as never before..
    Speed Up Browsing
    When you connect to a web site your computer sends information
    back and forth. Some of this information deals with resolving the
    site name to an IP address, the stuff that TCP/IP really deals with,
    not words. This is DNS information and is used so that you will not
    need to ask for the site location each and every time you visit the site.Although Windows XP and Windows XP have a pretty efficient DNS cache, you can increase its overall performance by increasing its size.You can do this with the registry entries below:Windows Registry Editor Version 5.00


     [HKEY_LOCAL_MACHINESYSTEM
    CurrentControlSetServicesDnscacheParameters]
    “CacheHashTableBucketSize”=dword:00000001
    “CacheHashTableSize”=dword:00000180
    “MaxCacheEntryTtlLimit”=dword:0000fa00
    “MaxSOACacheEntryTtlLimit”=dword:0000012d


    Make a new text file and rename it to dnscache.reg. Then copy and
    paste the above into it and save it. Merge it into the registry.


    Disable Indexing Services:

    Indexing Services is a small little program that uses large amounts of RAM and can often make a computer endlessly loud and noisy. This system process indexes and updates lists of all the files that are on your computer. It does this so that when you do a search for something on your computer, it will search faster by scanning the index lists. If you don’t search your computer often, or even if you do search often, this system service is completely unnecessary. To disable do the following:
    • Go to Start
    • Click Settings
    • Click Control Panel
    • Double-click Add/Remove Programs
    • Click the Add/Remove Window Components
    • Uncheck the Indexing services
    • Click Next
    Optimise Display Settings:

    Windows XP can look sexy but displaying all the visual items can waste system resources.

    To optimize:

    • Go to Start
    • Click Settings
    • Click Control Panel
    • Click System
    • Click Advanced tab
    • In the Performance tab click SettingsLeave only the following ticked:
    - Show shadows under menus
    - Show shadows under mouse pointer
    - Show translucent selection rectangle
    - Use drop shadows for icons labels on the desktop
    - Use visual styles on windows and buttons

    Speed Up Folder Browsing:

    You may have noticed that every time you open my computer to
    browse folders that there is a slight delay. This is because Windows XP automatically searches for network files and printers every time you open Windows Explorer.

    To fix this and to increase browsing significantly:

    • Open My Computer
    • Click on Tools menu
    • Click on Folder Options
    • Click on the View tab.
    • Uncheck the Automatically search for network folders and
    • printers check box
    • Click Apply
    • Click Ok
    • Reboot your computer
    Remove The Desktop Picture:

    Your desktop background consumes a fair amount of memory
    and can slow the loading time of your system.Removing 
     it will improve performance.

    • Right click on Desktop and select Properties
    • Select the Desktop tab
    • In theBackground windowselect None
    • Click Ok
    Disable Unnecessary Services:

    Because Windows XP has to be all things to all people it has many
    services running that take up system resources that you will never
    need.Below is a list of services that can be disabled on most
    machines:
    Alerter
    Clipbook
    Computer Browser
    Distributed Link Tracking Client
    Fast User Switching
    Help and Support – (If you use Windows Help and Support leave
    this enabled)
    Human Interface Access Devices
    Indexing Service
    IPSEC Services
    Messenger
    Netmeeting Remote Desktop Sharing (disabled for extra security)
    Portable Media Serial Number
    Remote Desktop Help Session Manager (disabled for extra security)
    Remote Procedure Call Locator
    Remote Registry (disabled for extra security)
    Remote Registry Service
    Secondary Logon
    Routing & Remote Access (disabled for extra security)
    Server
    SSDP Discovery Service – (Unplug n’ Pray will disable this)
    Telnet
    TCP/IP NetBIOS Helper
    Upload Manager
    Universal Plug and Play Device Host
    Windows Time
    Wireless Zero Configuration (Do not disable if you use a wireless network)
    Workstation

    To disable these services:

    • Go to Start and then Run and type “services.msc”
    • Double click on the service you want to
    • change Change the startup type to ‘Disable”
    Remove Annoying Delete Confirmation Messages

    Although not strictly a performance tweak I love this fix as it
    makes my machine ‘feel’ faster. I hate the annoying
    ‘are you sure?’ messages that XP displays, especially
    if I have to use a laptop touchpad to close them.

    To remove these messages:

    • Right-click on the ‘Recycle Bin’ on the desktop and then
    • click ‘Properties’
    • Clear the ‘Display Delete Confirmation Dialog’ check
    • box and click ‘Ok’!!
    If You Like This Post 1 Click On Below Ads :P


    Change Your Drives Background

    Hello To All friend today i am going to show you how can you change your drive background color .Which always white .You can change it to more live with your own picture Or Your photo.


    Just Follow Some Few Steps For Do this:
    • First your open your notepad.
    • Just put this code in your notepad
    [ExtShellFolderViews] {BE098140-A513-11D0-A3A4-00C04FD706EC}={BE098140-A513-11D0-A3A4-00C04FD706EC} [{BE098140-A513-11D0-A3A4-00C04FD706EC}] Attributes=1 IconArea_Image=name.jpg IconArea_Text=1000x000f00001 [.ShellClassInfo] ConfirmFileOp=0
    • Now save it as desktop.ini and save in your drive you like example drive E Or D .
    • Now copy your image(Change the name of image as "name" without qoutes)file to same location .
    • Open your drive from explorer or just open it from My computer
    • What You Find ?
    If You Like This Post 1 Click On Below Ads :P

    Easy Way to Hack WEP/WPA/WPA2 Wi-Fi Password

    If you are living nearby someones WiFi hotspot and every time your laptop search for connection its showing up but you don't have passwords. Or you just want to steal someones WPA/WPA2 Wi-Fi hotspot key or passwords. Don't worry...


    In this tutorial I’ll show How to hack a WPA/WPA2 Wi-Ficonnection through a bootable USB.
    Things you should need:

    • A USB pen drive.
    • beini.iso file. [Download it from HERE]
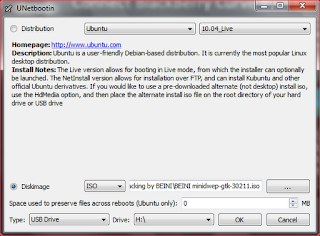
    • UNetbootin software to make your USB drive bootable. [Download for Windows, Linux or Mac]
    Some few steps you should to do ( WEP):
    • Write beini.iso on your USB by UNetbootin. Set everything according to this image bellow.
    Easy Way to Hack WEP/WPA/WPA2 Wi-Fi Password,wifi hacking,Easy Way to Hack WEP/WPA/WPA2 Wi-Fi Password.pdf,Easy Way to Hack WEP/WPA/WPA2 Wi-Fi Password pdf book,how to Hack WEP/WPA/WPA2 Wi-Fi Password
    • After finishing restart your PC and boot it from your USB.
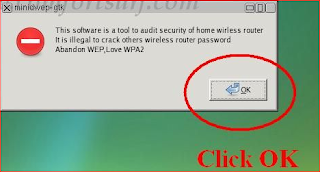
    • If you were successful to boot up then you should see something like this. Click Minidwep-gtk.
    WiFi Hacking2
    • Click OK.
    Easy Way to Hack WEP/WPA/WPA2 Wi-Fi Password,wifi hacking,Easy Way to Hack WEP/WPA/WPA2 Wi-Fi Password.pdf,Easy Way to Hack WEP/WPA/WPA2 Wi-Fi Password pdf book,how to Hack WEP/WPA/WPA2 Wi-Fi Password
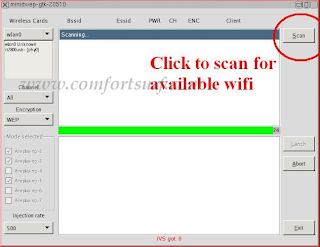
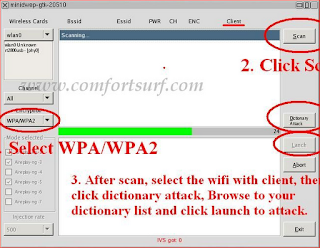
    • Now Minipwep-gtk  program will open. Click Scan.
    Easy Way to Hack WEP/WPA/WPA2 Wi-Fi Password,wifi hacking,Easy Way to Hack WEP/WPA/WPA2 Wi-Fi Password.pdf,Easy Way to Hack WEP/WPA/WPA2 Wi-Fi Password pdf book,how to Hack WEP/WPA/WPA2 Wi-Fi Password
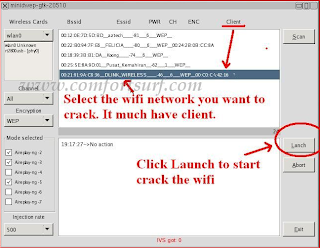
    • Select a wireless network(should have Clint) from the list. And click Lunch to start creaking process.
    Easy Way to Hack WEP/WPA/WPA2 Wi-Fi Password,wifi hacking,Easy Way to Hack WEP/WPA/WPA2 Wi-Fi Password.pdf,Easy Way to Hack WEP/WPA/WPA2 Wi-Fi Password pdf book,how to Hack WEP/WPA/WPA2 Wi-Fi Password
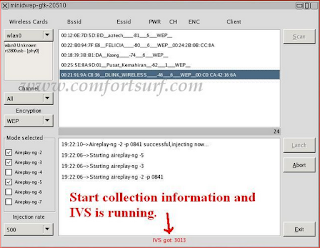
    • Sometimes its take a while according to your victim connections IVS value and password strength. So keep passions.
    Easy Way to Hack WEP/WPA/WPA2 Wi-Fi Password,wifi hacking,Easy Way to Hack WEP/WPA/WPA2 Wi-Fi Password.pdf,Easy Way to Hack WEP/WPA/WPA2 Wi-Fi Password pdf book,how to Hack WEP/WPA/WPA2 Wi-Fi Password
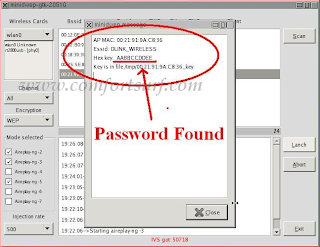
    • If it found a password, it should appear like this.
    Easy Way to Hack WEP/WPA/WPA2 Wi-Fi Password,wifi hacking,Easy Way to Hack WEP/WPA/WPA2 Wi-Fi Password.pdf,Easy Way to Hack WEP/WPA/WPA2 Wi-Fi Password pdf book,how to Hack WEP/WPA/WPA2 Wi-Fi Password
    • To creak WPA/WPA2 follow this image instruction.
    Easy Way to Hack WEP/WPA/WPA2 Wi-Fi Password,wifi hacking,Easy Way to Hack WEP/WPA/WPA2 Wi-Fi Password.pdf,Easy Way to Hack WEP/WPA/WPA2 Wi-Fi Password pdf book,how to Hack WEP/WPA/WPA2 Wi-Fi Password


    If You Like This Post 1 Click On Below Ads :P

    Hack Any Password Protected Wi-Fi


    This software price is $1099. Don't worry, I'm giving you for FREE.
    Download This Software from here:


    Note: Please turn off your anti-virus program before you install this software, otherwise this software will not work properly. After completing installing process you can re-run your anti-virus program.
    Now follow the Instructions bellow:

    •  Install the software and drivers.


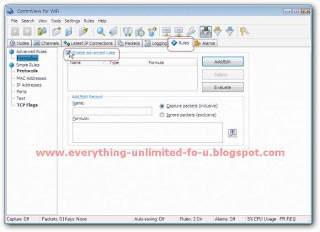
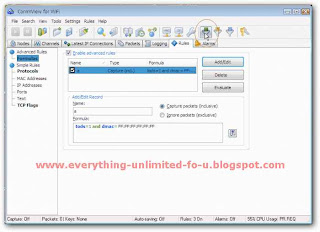
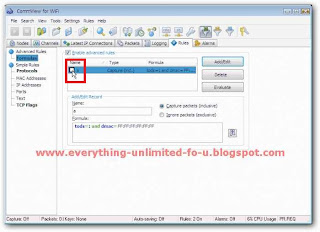
    • Click on ‘Rules’ tab and tick on ‘Enable advance rules’ option.


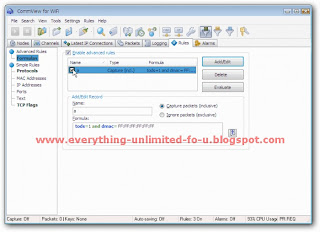
    • Type ‘a’ on Name box and Past this code on formula box “tods=1 and dmac=FF:FF:FF:FF:FF:FF” like picture bellow. Then click ‘add/edit’ button.
    • A window will appear like the picture bellow. Give a tick on ‘a’ .
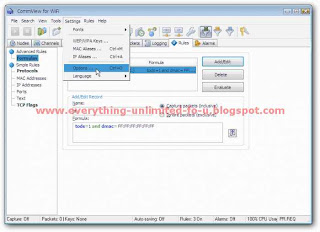
    • Then go to ‘Settings’ and click ‘Option’
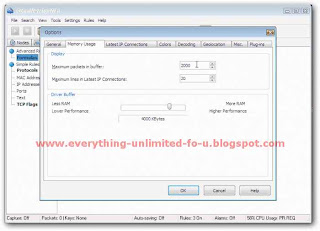
    • Go to ‘Memory Usage’ tab and set everything just like this picture & click ‘Ok’ (Restart may be required).
    • Check ‘D’ funnel and uncheck another two funnel from the right top of this window.

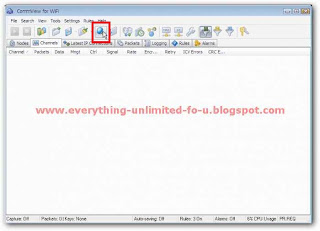
    • Click ‘Search’ button and find the network that you want to creak.
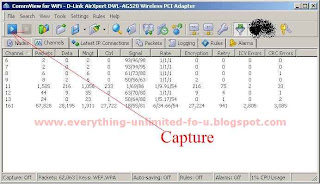
    • Then drag it on ‘Channel’ tab and click ‘Capture’ button.
    • Now which one is do not capturing anything give it to password protected network and connect it. When it will ask for password, give any as you wish.
    • It will show this massage “Connected with limited connectivity”.
    • (I have no Wi-Fi connections at this time. that is why, I can’t share some screenshots).
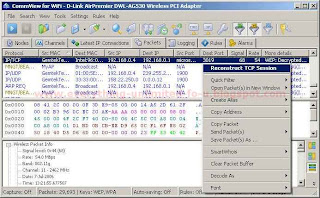
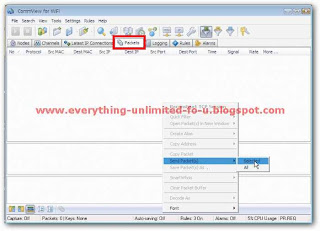
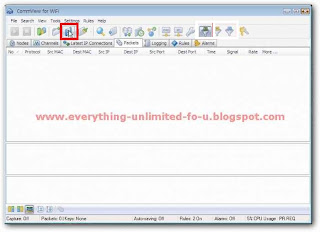
    • Click on main menu again and then click on ‘Packets’ Tab. If everything was all right, you will see some Couple of Packets.

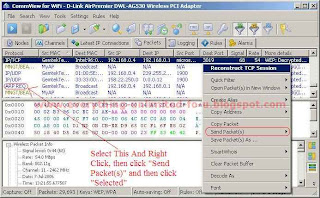
    • Click right button on “ARP REQ”  Packet and then > “Send Packet(s)” > Selected.
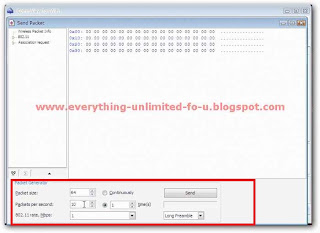
    • This menu will appear.

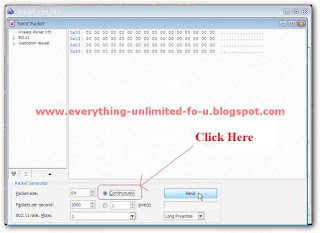
    • Now change all values just like this and click ‘Send’.

    • Go to ‘Rules’ Tab again and uncheck the Rules “a” .
      • Select first 20000 packets and save it. Make sure you are saving it as “dump"cap” file in place of “ncf” file format. (I have no Wi-Fi connections this time, that is why I can’t share some screenshots).
      • Now download a zip folder named “Aircrack-NG” from --> Click HERE. And extract it.
      • Open ‘bin’ folder and run this file ‘aircrack-ng-GUI.exe’. Then go where you saved the packets, select all and click launch.
      • An ‘IV’ list will came. Select the network that you want to creak.
      • Click ‘Connect’. You will be connected with your desire network like a magic !
      • Enjoy the Unlimited Wi-Fi Internet.
      If You Like This Post 1 Click On Below Ads :P